As soon as I saw the Porcelain Sweater knitting pattern on social media, I immediately knew I had to make it. There is just something about blue and white/cream floral patterns which I cannot get enough of. My phone case, half my summer wardrobe, and some of my home decorations follow this design, but I had a sweater-sized hole in my collection.
When I started knitting in September 2025, and based on my limited knowledge of how long knitting projects can take, I thought by February 2026 I might have just finished knitting my first sweater. If you’d have told me I would have finished my first sweater, knitted a pair of colourwork mittens, and then completed my first colourwork sweater, I might have thought you were insane.
Now that the project has been completed, blocked, and worn a couple of times, I thought I’d write up a Porcelain Sweater pattern review as a knitting newbie!

Project preparation
Sizing decision
After a lot of scrolling through the Ravelry projects for this pattern, I came to the conclusion that I definitely needed to size up from the suggestion in the pattern. My suggested size was originally a Medium, which had a suggested positive ease of 15-20cm, however, I wanted a more oversized look, so I went for a Large instead.
Yarn choice
The pattern recommends Sandnes Garn Tynn Peer Gynt, and Tynn Silk Mohair. As this would be my first colourwork project, and my first project with mohair, I had to balance cost risk and itchiness when I was researching which yarns to use. As I’m still learning, I didn’t want to spend too much on the yarn for this sweater, but I’m also keen to always be using natural yarns (i.e. no acrylic etc).
Based on the Ravelry projects I saw, I decided to go with Drops Flora in Indigo, held with Drops Kid-Silk in Cobalt for the colourwork sections. I just loved the look of the dimension these two colours created together, and Drops is obviously more of a budget-friendly option. However, I also saw a lot of reviews saying that Kid-silk is quite itchy on the skin, so while I thought this would be okay for the smaller blue sections, I wanted to see if I could find a softer mohair option for the plain stockinette.
After some research, I went with Drops Flora in Off White, and Yarnsmiths Kids Mohair Silk in Cream for the plain stockinette sections. Although there aren’t as many reviews of the Yarnsmiths Mohair, the ones I did find seemed to suggest it was slightly softer than Kid-Silk, so I decided to give that a go. Since I don’t have any other mohair silk projects to compare it to, I find it hard to give a review on the choices I made. While I can say the final jumper is lovely and soft, it does definitely cause a small amount of itchiness, especially around the neck area.
Pattern construction
Top front and back sections
As a new knitter, this pattern was the first time ever knitting colourwork flat, and I couldn’t help but feel a bit intimidated by it after watching videos of people talking about their troubles with it.
The biggest adjustment was obviously learning how to handle two different colours along on the purl rows. These rows definitely took longer than the knit rows, but it wasn’t too bad in the end! I knit using the flick method, and I think a lot of people who knit continental style struggle more with the purl rows because it’s a bit more of an awkward hand position.
Another aspect of the flat rows was the edge stitches. I decided to do as the pattern said and knit the last stitch in every row (even the purl rows), but I’ve since seen a lot of people say that it doesn’t create as nice of an edge as continuing with the stockinette.
The body and sleeves – colourwork in the round
Joining in the round after knitting flat was a truly wonderful feeling in this project. Once I was in the flow, it felt like the body knit up super quickly over Christmas.
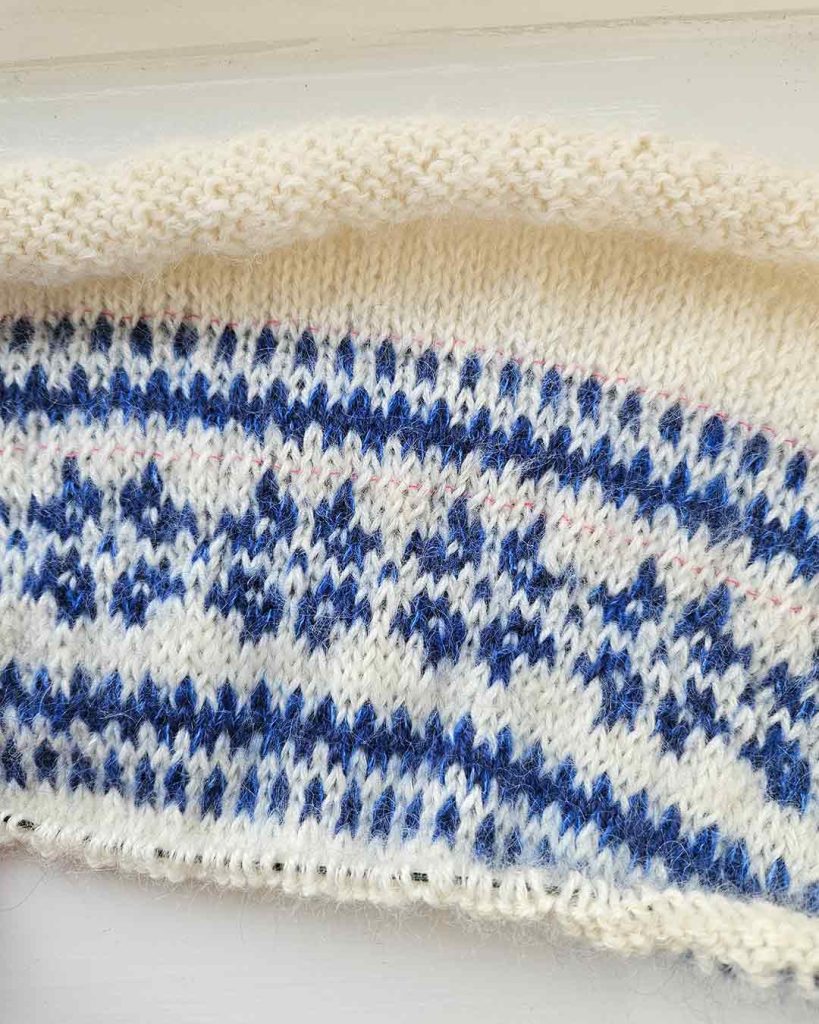
For each colourwork section, I went up to 5.0mm needles from 4.5mm needles. In hindsight, I think I could’ve even gone up another needle to 5.5mm, as there’s a noticeable dip into the tighter colourwork sections, especially on the sleeve.
Picking up stitches was probably one of the trickiest parts of this project for me. I had never previously picked up stitches around an armhole before, and I ended up having to start again multiple times to truly understand what I needed to do here, especially with the edge stitches I chose to do. In the end, I picked up a few extra stitches than the pattern called for and then decreased on the next round.
Finishings – ribbing and collar
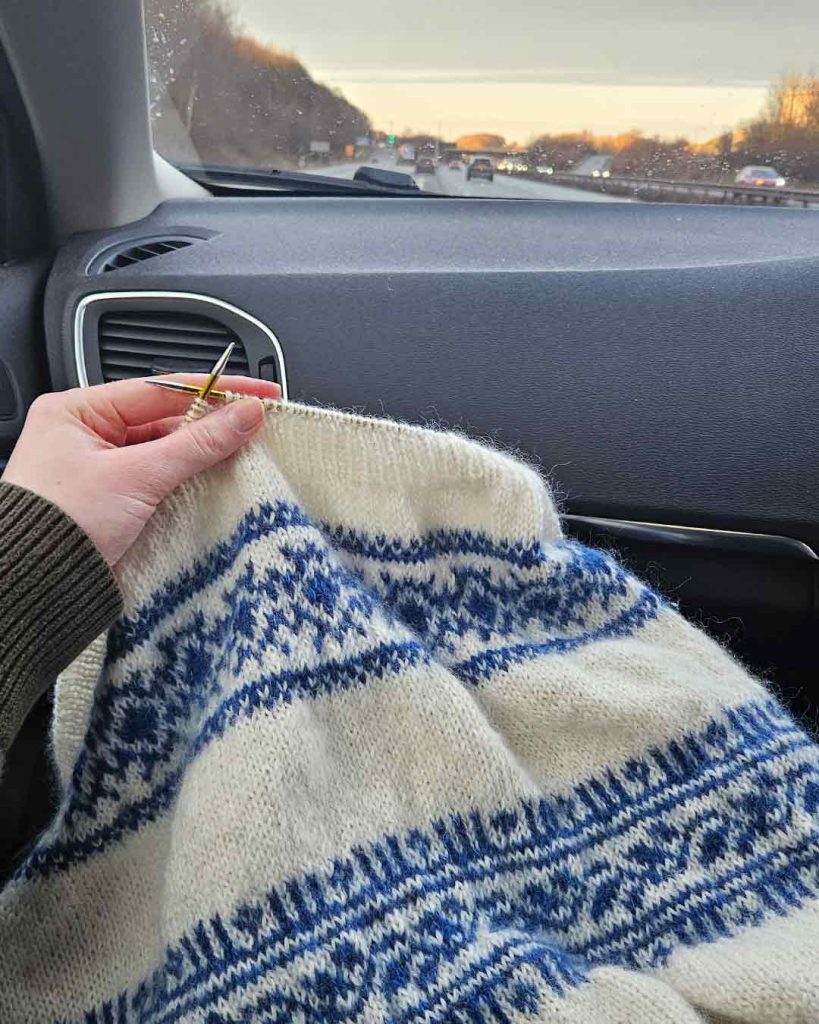
I naively saved the body ribbing for a road trip at the start of January, thinking I could finish it on the journey, and then do the sleeves during the trip. In the end, I had only just finished the body ribbing when I’d returned home from the trip!
I used this tutorial to understand how to knit the folded collar down, and I worked well for me. I had to be careful with not binding it off to tightly though. At the start I would feel myself pulling it a tad too tightly, and was conscious I wouldn’t be able to get it over my head.
Blocking – where the magic happens
Colourwork projects really make you appreciate the true magic of blocking.
I was a bit nervous while knitting this sweater, because there was a lot of rippling across the colourwork sections as I was knitting. I imagine there’s more I could do to improve my colourwork tension in general, but based on other comments I’d seen, I knew that blocking would help to relax the whole jumper.
In the first image below, you can see the rippling I mentioned as I was working on the body. You can then see how much the blocking process had already smoothed those ripples out while it was on the blocking mats:


Fit and final thoughts
Now the Porcelain Sweater is blocked, and I’ve worn it out a few times, I can definitely say that I’m glad I sized up to a Large. I love the slouchier, cosier feel of the sweater, and the body and sleeve length is perfect for me.
One thing I have noticed on mine is that the plain stockinette in the sleeves is noticeably looser than the colourwork sections, which ends up giving a bit of a wavy silhouette to the arms. However, since the arms a bit oversized anyway, it’s not really that obvious unless my arms are outstretched for some reason.
As a beginner, this project was a real challenge and major milestone for me. I learnt how to knit colourwork flat, manage tension across colourwork, pick up armhole stitches, and knit with multiple strands held together.
Where I had almost sped through my previous two projects to get to the more interesting patterns, I really slowed down for this one, and didn’t put too much pressure on myself to finish it quickly, which made the whole project more enjoyable. The finished product feels classic, timeless and very ‘me’, so it’s been a great addition to my wardrobe.
If you’re a new knitter and have been wondering whether to give the Porcelain Sweater a try, then I say go for it! If you’ve got the basics down, and have tried out colourwork, then this is great challenge to give a go.
Looking to give knitting a go for the first time? Here are 5 reasons to learn how to knit in 2026.


Porcelain Sweater details
Pattern: Porcelain Sweater
Designer: Le Knit
Construction: Top-down
Techniques: Fair Isle colourwork/stranded knitting
Size knit: Large
Yarn used: Drops Flora in Off White and Indigo. Drops Kid-silk Mohair in Cobalt. Yarnsmiths Kids Mohair Silk in Cream
Needle sizes used: 3.5mm (ribbing), 4.5mm (plain stockinette), 5.0mm (colourwork stockinette)
Hello,
As I really like this design and plan to realize it quite soon myself, I really enjoyed this post and your experience, thank you 🙂